As I explained in the last episode, to podcast we need a good quality raw file, usually in .wav format. This file type is a rich medium, it contains much of the sound and lots of noise if not recorded with thought. In that episode I explained the virtues and flexibility of smartphones with or without an attached shotgun mic.
Sometimes though, the optics are as important as the audio. Managers may need to see a mic on a stand to understand what’s going on. Again, I make choices in this area to allow mobility. Most mics are designed for music, not unreasonably but some are focused on the spoken word. A company dedicated to vocal recording, in the journalistic space, is Zoom. No, not the video messaging Zoom, the other Zoom.
What I use is a Zoom H2n audio recorder. This doubles as a mobile recorder as well. An improvement on the Zoom H2 it is a common tool for outside broadcast journalists gathering audio. It’s robust, has a huge number of customisable settings and can record on one side of the machine or both. I have it setup to record just on my side and we’ll get to why later.
So I go for robust, mobile devices with either a built-in narrow arc of recording, the Rode, or one with more choices but still with a way to focus the recording pattern.
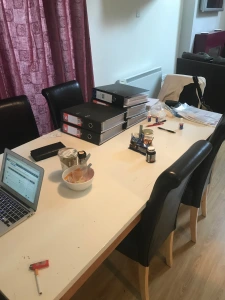 To the actual space I’m using now.
Here we see the desk and one possible setup. Open space to the right, a hard wall beyond the thin curtains.
The open space to the right ends in hard walls.
So if I sit at the laptop as pictured, my voice would travel down the room, maybe bounce back or reflect off the side walls.
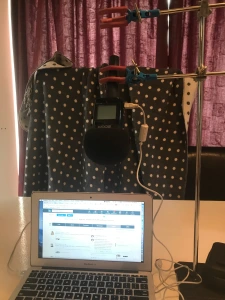 And here’s how the space is modified to improve it.
I’ve moved to face the curtains. These act as a dampener on reflected sounds. But they are too thin to do a good job. So between the table and the curtains, I have a clothes drying rack covered by a heavy throw rug that remains ruffled. No flat reflective surfaces. The mic to the top right of the pic is suspended on an old laboratory stand that keeps it just to the right hand side of my mouth. I’ll cover mic technique in another post.
Sound is picked up by the mic, is absorbed by the throw rug and curtains and doesn’t bounce back for re-recording. By using the Zoom, with the settings I’ve discovered work best for my voice, the quality of the .wav file is more than good enough for what I need.
The key points are that the mic is, to some degree, irrelevant. The space you’re recording in is paramount. For “in the field”, read a client’s home or a day program venue, think about sound movements and background noise. Some levels of the latter can be dealt with in the post recording process but it’s easier to have clean audio to start with.
Once that’s established, experimentation with mics begins. This could be an expensive game but needn’t be. My rule of thumb is to look to the professions who work outdoors and go from there. Hence a shotgun or a field recorder.
I had a student whose budget stretched to $35. He picked up a Chinese knockoff mic on eBay and just made it work. He told me it created horrible audio until he found both the sweet spot in relation to its distance from him and he’d learnt to control his breath and the noises it made. The results were outstanding.
Incidentally I’ll be doing an episode on the voice with lots of examples of what not to do, because that’s easy and then correct technique which is also easy but requires a little thought and discipline.
Think about what you’re doing for your service through your podcast and go from there. We can discuss these sorts of things in a scoping call if you’re interested in getting your podcast up and running. The links to my Linkedin page for DMs and my email are in the show notes.
Until next time, bye.